Stocking Up: An Overview
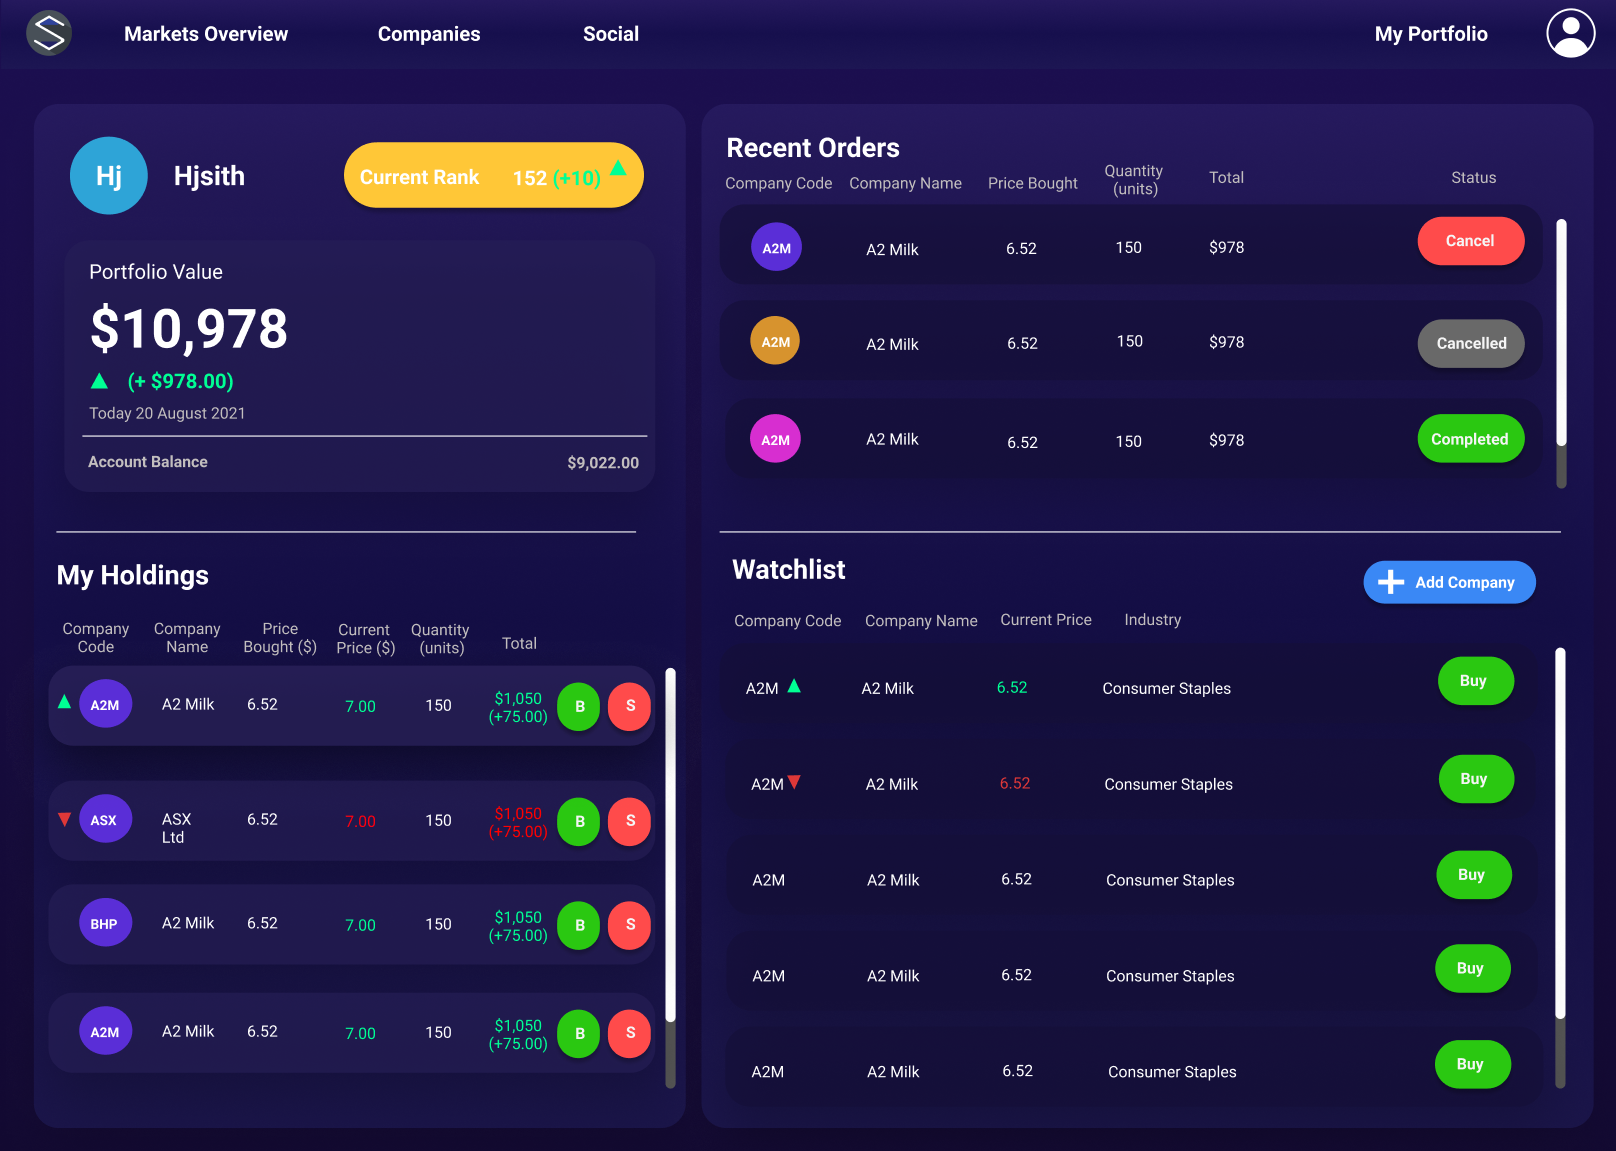
 The Stocking Up portfolio view.
Introduction
Why V2?
Well, let’s start from the beginning. The original Stocking Up was a Visual Basic + .NET WinForms application that I had created in high school.

The crux of the application was simple: a virtual stock market where users (students in this case) could trade within, and thereby learn about, the stock market. The application features were quite simple: a portfolio management system, near real-time price data from the ASX, a tutorial system, interactive graphs and local save data. I was immensely proud of the result, especially considering that this was my first time utilising VB .NET (as in the past, my high school forced us to use Visual Basic 6).
 I remember seeing this screen everyday for months.
However, even throughout the development process, I felt something truly missing in the application: social interaction. At this point, I had been working on the project for 6 months, and I didn’t have that much time to change my application fundamentally. After completing the project, the thoughts of a shared virtual stock market application continued to fester in my mind. Throughout university, being exposed to more modern technologies/concepts such as Software as a Service and Hybrid Web Applications allowed me to conceptualise how this shared virtual stock market would operate.
Finally, for the subject Advanced Software Development, we were presented with the opportunity to develop a full-stack application of our choosing. My group and I were very excited to build Stocking Up V2. However, we quickly realised things weren’t going to be that easy.
Hitting the ground somewhat running
On the very first day of this project, I quickly realised how big of a venture this would take. Per our university’s policies of plagiarism and such, we decided that not a single resource, line of code, or even user interface design from Stocking Up was going to be used. Everything would have to be built from scratch (just thinking about it now, converting a VB. NET code base to JavaScript would’ve been a nightmare).
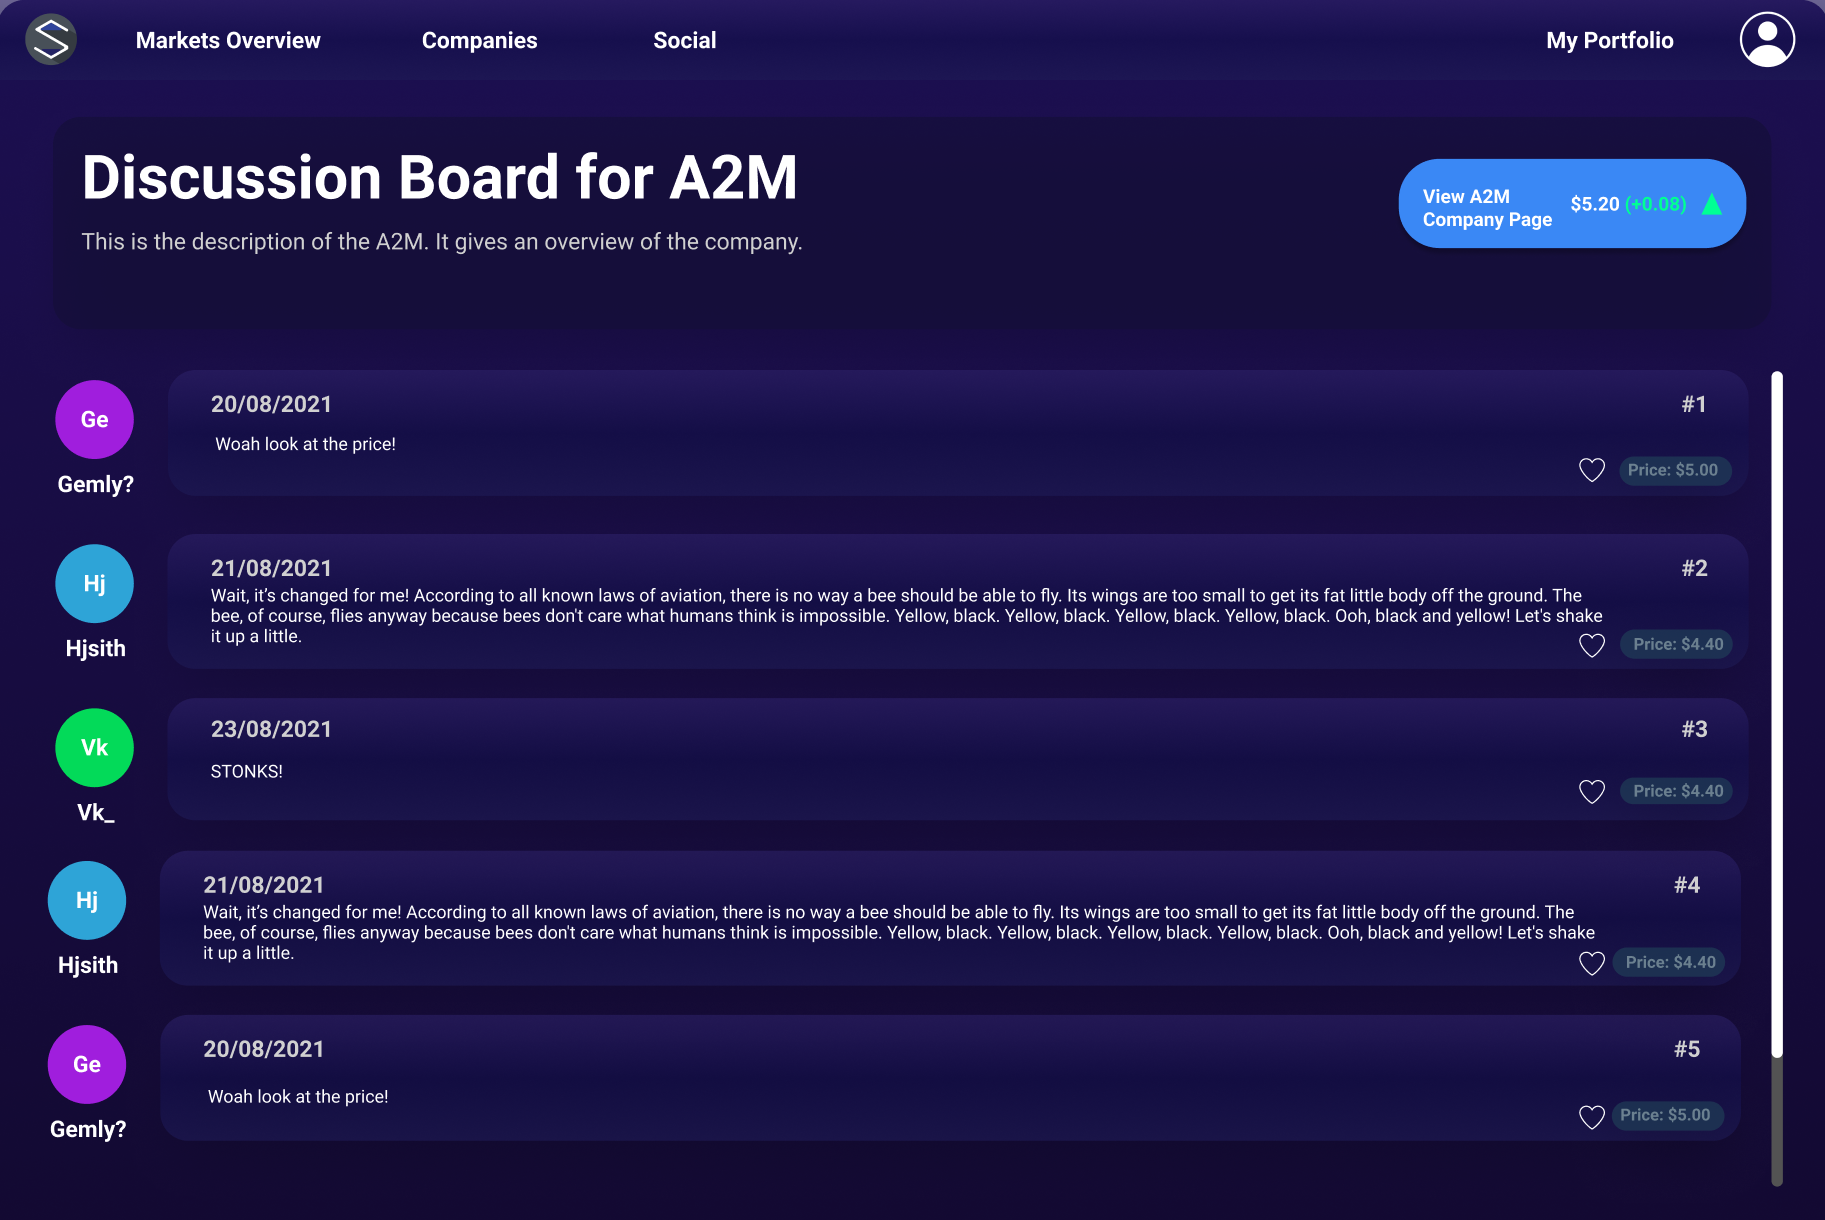
We first came up with a list of desirable features for our application and then assigned two of them to each group member. We then hopped onto a shared Figma document where each group member designed the UX/UI for their respective features. During this process, we constantly communicated with each other on the overall look/feel of the user interface. After spending the entirety of one of our 2 hours meetings deciding on a colour theme, we finally finished our user interface designs (some of which you can see below).

The tech stack
As the two people in the group with the most software development experience, James and I were presented with the difficult task of selecting the tech stack we would use throughout the project. Luckily, we had experience utilising React, Express and Node.js in a previous university assignment.
React

As you can see with some of the mock designs, there are a lot of commonalities between each screen’s UI. This reason is why we chose React because of its focus on reusable components. We also chose React because of its ease of learning and use, especially since most of our group had no prior experience with React.
Express and Node.js
We knew from the beginning that if we were going to create a JavaScript web app, we’d be utilising Node.js. We chose Node.js not only because of our familiarity with it but also saw the benefits of using npm throughout the development of our application, especially when it came to integrating unit testing frameworks.
We also chose Express because it allows us to quickly serve our “built” React page, quickly incorporate other middleware modules and define various routes for our application.
In regards to our choice of platform for hosting our application, we chose Microsoft Azure which I’ll be detailing in the following section.
Microsoft Azure
We chose Microsoft Azure to host our application mainly due to our collective knowledge on setting up App Services to host Node.js/React web applications. As you’ll read later, we also decided that Microsoft Azure would be a great platform to use as we needed to utilise Azure DevOps to host our CI/CD pipelines, repos and kanban boards. We also required Azure Functions for some of our data logic (which will be discussed later).
Azure App Service
Setting up the Azure App Service was quite simple. We chose the Basic pricing tier - opting for a B2 Linux instance, which comes with 2 cores, 3.5GB of RAM and 10GB of storage. We decided that Stocking Up V2, a university assignment, would not need complex auto-scaling or traffic management, so this was perfect for our use case.
We selected our stack to be Node, as decided earlier, setting our major version to be Node 14 and our minor version being Node 14 LTS. We also learnt that you could expose environment variables with the application settings of the App Service. These environment variables are encrypted at rest and transmitted over an encrypted channel. These variables allowed us to access critical key-value data within our code, such as our database connection strings and database username and password.
SQL Database
 We went with the Standard service tier with our SQL database, with 10GB of storage and 10 DTUs. It roughly amounted to AUD 23 every month and was more than enough to store our predominantly integer data. In the end, our program only utilised 66MB of storage! (It’s interesting to consider that our application stored historical price data for the past day, 5 days, two weeks and month + other data, which still only amounted to 66MB of data)
CI/CD with Azure DevOps

Setting up CI/CD with Azure DevOps was quite a learning experience. James and I thought it would be pretty simple: follow the guided setup, and everything will be fine!
It was quite the opposite. First, we had an issue with getting our pipeline running and were presented with “No hosted parallelism has been purchased or granted.” After a lot of confusion, we learnt that Microsoft changed their policies on granting free CI/CD to all projects. We were using a private repo, so we needed to request the free tier.
A day or two after submitting the form, our request was approved, and we were back on track - or so we thought. We faced a new error, and for days, James and I stared at this error wondering what we had done wrong:

This error was quite weird, as when we SSH’ed into our App Service instance, we could clearly see the index.html file in its corresponding directory. After many days of debugging, frustrations, and even recreating the App Service, we decided to rewrite the Pipeline YAML to include the front-end building during the deployment, and surprisingly, this solved the problem.
Building + Testing + Deployment
Below you can see the Building, Testing and Deployment stages of our azure-pipelines.yml file. Some key things to note: We set success conditions on the Deploy and Test stages to depend on their previous stages. We also generated a junit.xml file that allowed our test results to be nicely displayed on the Azure Pipelines’ test screen!
- stage: Build
  displayName: Build stage
  jobs:
    - job: Build
      displayName: Build
      pool:
        vmImage: $(vmImageName)
      steps:
        - task: Npm@1
          displayName: "NPM Install Server"
          inputs:
            command: "install"
            workingDir: "server"
        - task: ArchiveFiles@2
          displayName: "Archive files"
          inputs:
            rootFolderOrFile: "$(System.DefaultWorkingDirectory)"
            includeRootFolder: false
            archiveType: zip
            archiveFile: $(Build.ArtifactStagingDirectory)/$(Build.BuildId).zip
            replaceExistingArchive: true
        - upload: $(Build.ArtifactStagingDirectory)/$(Build.BuildId).zip
          artifact: drop

- stage: Test
    displayName: Test stage
    dependsOn: Build
    condition: succeeded()
    jobs:
      - job: Test
        displayName: Test
        pool:
          vmImage: $(vmImageName)

        steps:
          - task: NodeTool@0
            inputs:
              versionSpec: "14.17.6"
            displayName: "Install Node.js"

          - script: |
              cd server && npm install && npm run test:ci
            displayName: "npm install and output test results"

          - task: PublishTestResults@2
            displayName: "supply npm test results to pipelines"
            condition: succeededOrFailed()
            inputs:
              testResultsFiles: "server/junit.xml"

- stage: Deploy
  displayName: Deploy stage
  dependsOn: Test
  condition: succeeded()
  jobs:
    - deployment: Deploy
      displayName: Deploy
      environment: $(environmentName)
      pool:
        vmImage: $(vmImageName)
      strategy:
        runOnce:
          deploy:
            steps:
              - task: AzureRmWebAppDeployment@4
                displayName: "Azure App Service Deploy: stocking-up"
                inputs:
                  azureSubscription: $(azureSubscription)
                  appType: webAppLinux
                  WebAppName: $(webAppName)
                  packageForLinux: "$(Pipeline.Workspace)/drop/$(Build.BuildId).zip"
                  RuntimeStack: "NODE|14-lts"
                  StartupCommand: "npm run start"
                  ScriptType: "Inline Script"
                  InlineScript: |
                    npm run build
Front-end tech and structure

We followed the traditional setup of a React application for our application’s front-end, sectioning off our components and pages into separate folders within the src folder. For our other resources, such as images and CSS, we kept them within an assets folder with the src folder.
Class React components
There are two approaches to creating components in React: Functional and Class. Our group predominantly used Class React components within Stocking Up V2 as we wanted to access the React lifecycle methods and have direct control over the logic and states. Below you can see a small example of one of our Class components:
import React from "react";

class FriendHeading extends React.Component {
  constructor(props) {
    super(props);
  }

  render() {
    return (
      <>
        <h2 className="FriendHeading">{this.props.title}</h2>
      </>
    );
  }
}

export default FriendHeading;
Backend for Frontend
We decided to integrate our ‘Backend for Frontend’ functionality directly into our component files. This format made understanding the data flow a lot easier instead of calling a helper method from another file to retrieve the data. Below you can see an example of how this looked:
  componentDidMount() {
    fetch("/api/investor" + "?id=" + this.props.userId, {
      method: "GET",
      headers: {
        "Content-Type": "application/json",
      },
    }).then((res) => {
      res.json().then((body) => {
        this.setState({
          username: body.Username,
        });
      });
    });
  }
Cool packages/resources we used!
For the front-end of our application, we utilised quite a few nifty packages and resources that made the development experience a whole lot easier!
For example, we utilised React Bootstrap for key UI components such as the Navigation Bar and some buttons. We also used Bootstrap to get more control over the theme of our application.
Back-end tech and structure

Our back-end ‘server’ folder had 4 main sections: the db folder (for database and model stuff), the functions folder (which contained controllers for each of the models), the routes folder (which defined our application endpoints for the API and their corresponding tests) and finally the root, where we stored our core server files (which acts the as the foundation for our back-end).
Sequelize
We chose Sequelize to be our back-end’s ORM as it is a promised-based Node.js ORM that works with Microsoft SQL Server. In Sequelize, models represent our database tables and interact with the data within these tables. Below is a model that I defined for Investors:
export const Investor = db.define(
  "Investor",
  {
    InvestorID: {
      type: DataTypes.UUID,
      defaultValue: DataTypes.UUIDV4,
      primaryKey: true,
    },
    InvestorFName: DataTypes.TEXT,
    InvestorLName: DataTypes.TEXT,
    InvestorEmail: DataTypes.STRING,
    InvestorPassword: DataTypes.TEXT,
    Username: DataTypes.TEXT,
    NetWorth: DataTypes.DECIMAL(20, 2),
    InvestorRanking: DataTypes.INTEGER,
    InvestorDifficulty: DataTypes.TEXT,
    DateJoined: DataTypes.DATEONLY,
    Title: DataTypes.TEXT,
    Funds: DataTypes.DECIMAL(20, 2),
  },
  { sequelize: db, tableName: "Investor", timestamps: false }
);
As you can see, we mimic our table. This way, we can directly call methods that interact with our database tables, such as findByPk or findOne. These methods offer a lot of customizability, especially for more challenging, more complicated queries. We often would wrap these complex queries into functions stored in our functions folder. For example, I wrote a function that utilises Sequelize models and methods to get all the current friends for a user.
//Gets all CURRENT friends based on the corresponding user id
export async function getAllCurrentFriendsForUser(id) {
  return await Friends.findAll({
    where: {
      [Op.or]: [{ RequestingUsername: id }, { AcceptingUsername: id }],
      Status: 1,
    },
  });
}
Order Queues
It often takes some time for your pending order to execute in a stock market. I wanted to simulate this experience by utilising Order Queues for our application. After placing an order, it would take 15 minutes to execute your order. As I faced this problem after I dealt with the Azure Functions (as discussed later), I didn’t want to add another recurring cost to our already wallet-draining Azure Function set.
So after a bit of research, I decided to look into local CRON jobs that could operate on a background thread and finally settled on Node-CRON, an npm package that allows you to schedule functions based on CRON statements. You can see how I scheduled this below:
if (env.node_env != "test") {
  cron.schedule("* * * * *", async function () {
    await pendingOrderCheck();
  });
}
This CRON job occured every minute of the day would check if there was any pending order. You can see the pendingOrderCheck function below:
export async function pendingOrderCheck() {
  let now = moment.utc();
  console.log(
    "Checking for pending orders prior to: " +
      moment.utc(now, "YYYY-MM-DD HH:mm:ss").format()
  );

  getAllPendingOrders() //Gets all pending orders for the database
    .then((pendingOrders) => {
      pendingOrders.forEach(async (elem) => {
        let orderTotal = elem.OrderTotal;
        let investorID = elem.InvestorID;
        let hasExecuted = await investorBuy(investorID, orderTotal);
        if (hasExecuted) {
          elem.Status = "EXECUTED";
          await Holding.create({
            InvestorID: elem.InvestorID,
            ListingID: elem.ListingID,
            OrderID: elem.OrderID,
            Current: true,
          });
          console.log(
            "Order executed with price and listing code: " +
              elem.OrderTotal +
              " " +
              elem.ListingID
          );
          await elem.save();
        } else {
          elem.Status = "CANCELLED";
          console.log(
            "Order cancelled with price and listing code: " +
              elem.OrderTotal +
              " " +
              elem.ListingID
          );
          await elem.save();
        }
      });
    })
    .then(() => {
      console.log("Done checking for pending orders");
    });
}
This function took me ages to figure out, but I got it working in the end, and I’m thrilled with the result!
Unit Testing
For unit testings, we utilised Jest in conjunction with SuperTest. It was our first venture into unit testing for some of us, so we wrote basic yet succinct tests for our applications. You can see one of them below:
describe("Friends endpoint", () => {
  //Unit test that checks that a user can add another user
  it("Allows user1 to add user2", async () => {
    const res = await request(app)
      .post("/api/friends/add")
      .send({
        rId: user1.body.id,
        aId: user2.body.id,
      })
      .set("cookie", cookie1);
    expect(res.status).toEqual(201);
    expect(res.body).toEqual(expect.any(Object));
  });
});
Crazy API stuff!
Price Data
I was responsible for devising a method to retrieve/store both current and historical stock data. I first looked into WebJobs, which can run background tasks within Azure App Service. However, WebJobs is unavailable for Linux instances, so that idea was a bust. I then remembered that Azure Functions existed!
I started writing an Azure Function that would connect to an API, retrieve stock data and store it within our database! The thing was: we needed 4 different types of historical data (alongside current price retrieval). So I decided to create 3 separate functions (One-Day, Five-Day and End-Of-Day) and schedule them using CRON statements.
{
  "bindings": [
    {
      "name": "One-Day",
      "type": "timerTrigger",
      "direction": "in",
      "schedule": "0 */10 0-6 * * 1-5"
    }
  ]
}
The One-Day function, which corresponds to the last day of price data, would run every 10 minutes, logging the current price.
try {
  await sequelize.authenticate();
  context.log("Connection has been established successfully.");
} catch (error) {
  context.error("Unable to connect to the database:", error);
}

await sequelize.sync();

const listings = await Price.findAll();

let then = moment(now).subtract(10, "minutes");
let utcTime = moment.utc(then, "YYYY-MM-DD HH:mm:ss");

context.log("Starting to add one day historical prices...");

for (var i = 0; i < listings.length; i++) {
  await OneDay.create({
    ListingID: listings[i].ListingID,
    PastPrice: listings[i].CurrentPrice,
    DateTimeOfPrice: utcTime,
  });
}

context.log("Added one day historical prices successfully.");
context.log("Starting to add current prices...");

for (var i = 0; i < codes.data.values.length; i++) {
  let price = prices.data.values[i][0] == "#N/A" ? 0 : prices.data.values[i][0];

  const [listing, created] = await Price.findOrCreate({
    where: { ListingID: codes.data.values[i][0] },
    defaults: {
      CurrentPrice: price,
    },
  });

  if (!created) {
    listing.CurrentPrice = price;
    await listing.save();
  }
}

context.log("Added current prices successfully.");
Likewise, the Five-Day function would execute similarly, except it would run every 30 minutes (as the price data in a five-day range is only needed so frequently).
On the other hand, the End-Of-Day function was responsible for deleting out-of-date data whilst also storing the closing price in the Two-Week and One-Month tables:
try {
  await sequelize.authenticate();
  context.log("Connection has been established successfully.");
} catch (error) {
  context.error("Unable to connect to the database:", error);
}

await sequelize.sync();

const listings = await Price.findAll();

let then = moment(now).subtract(10, "minutes");
let utcTime = moment.utc(then, "YYYY-MM-DD HH:mm:ss");

context.log("Starting to add five day historical prices...");

for (var i = 0; i < listings.length; i++) {
  await FiveDays.create({
    ListingID: listings[i].ListingID,
    PastPrice: listings[i].CurrentPrice,
    DateTimeOfPrice: utcTime,
  });
}

context.log("Added five day historical prices successfully.");

const dayEndPrices = await FiveDays.findAll({
  where: {
    DateTimeOfPrice: utcTime,
  },
});

let utcDate = moment.utc(then, "YYYY-MM-DD");

context.log("Starting to add two weeks prices with date: " + utcDate);

for (var i = 0; i < dayEndPrices.length; i++) {
  await TwoWeeks.create({
    ListingID: dayEndPrices[i].ListingID,
    PastPrice: dayEndPrices[i].PastPrice,
    DateTimeOfPrice: utcDate,
  });
}

context.log("Added two weeks prices successfully.");
context.log("Starting to add one month prices with date: " + utcDate);

for (var i = 0; i < dayEndPrices.length; i++) {
  await OneMonth.create({
    ListingID: dayEndPrices[i].ListingID,
    PastPrice: dayEndPrices[i].PastPrice,
    DateTimeOfPrice: utcDate,
  });
}

context.log("Added one month prices successfully.");
context.log("Starting to remove one day prices...");

await OneDay.destroy({
  where: {
    DateTimeOfPrice: {
      [Op.lt]: moment.utc().subtract(1, "days"),
    },
  },
});

context.log("Removed old one day prices successfully.");
context.log("Starting to remove five day prices...");

await FiveDays.destroy({
  where: {
    DateTimeOfPrice: {
      [Op.lt]: moment.utc().subtract(7, "days"),
    },
  },
});

context.log("Removed old five days prices successfully.");
context.log("Starting to remove two weeks prices...");

await TwoWeeks.destroy({
  where: {
    DateTimeOfPrice: {
      [Op.lt]: moment.utc().subtract(18, "days"),
    },
  },
});

context.log("Removed old two weeks prices successfully.");
context.log("Starting to remove one month prices...");

await OneMonth.destroy({
  where: {
    DateTimeOfPrice: {
      [Op.lt]: moment.utc().subtract(31, "days"),
    },
  },
});

context.log("Removed old one month prices successfully.");
context.log("Complete!");
News Feed
Vishaal was responsible for getting the news data for the application. He wrote an excellent function, using Sequelize models, allowing for articles to be stored in our database (and updated). You can see the code below:
export async function updateArticles() {
  let now = moment.utc();

  console.log(
    "Looking for new articles to add to the page!" +
      moment.utc(now, "YYYY-MM-DD HH:mm:ss").format()
  );

  const res = await getNewsData();

  for (let i = 0; i < res.data.articles.length; ++i) {
    const articleFound = await Articles.findOne({
      where: {
        ArticleName: res.data.articles[i].title,
      },
    });

    if (articleFound == null && res.data.articles[i].url != null) {
      await Articles.create({
        ArticleName: res.data.articles[i].title,
        ArticleDate: res.data.articles[i].publishedAt,
        ArticleInfo: res.data.articles[i].description,
        ArticleImage: res.data.articles[i].urlToImage,
        ArticleURL: res.data.articles[i].url,
        ArticleSource: res.data.articles[i].source.name,
      });
    }
  }
}
Final Screenshots
Some of the final Stocking Up V2 screenshots
Fun tidbits
- James wrote a very cool class component for the User Profile Icons that takes in the user’s name, hashes it and returns a predetermined colour for it. Pretty cool!
- When testing the pending order check, we noticed that many pending orders were being executed twice! It turns out, one of us was running a local copy of the application, which doubled up with the App Service copy, thereby causing the CRON job to run twice simultaneously.
Concluding thoughts
Overall, this university assignment was a great way to end my undergraduate degree! I was incredibly proud of the work my fellow team members accomplished, and I can say I couldn’t have done it without their support and expertise.
As you can tell, this project allowed us to learn a lot of modern web application development, especially CI/CD and cloud technologies. I can say that there’s still a lot to learn, so if you have any advice, please shoot me a message or leave a comment below!